Monday, January 21, 2013

Search for "MY" perfect chocolate chip cookie

By Juanita

So I have been hunting for the perfect chocolate chip cookie (CCC) for some time now. I decided to try a Levain Bakery copycat recipe because from the pictures its looks like heaven. Thick, chewy, crunchy, and gooey yum yum. I researched all the copycats I could find and did a little tweaking to the one i chose which came from cookieash.blogspot.com I only made a half batch so i halved everything except the nuts and chocolate chips because I always add more. I also added 1/2 T of cornstarch.and this is what i got:


First we start with the usual suspects


Standard creaming method


The hardest part for me is trying not to over mix. If I see chunks of butter i want it smooth but i restrained myself. Also the recipe called for cold butter so I knew it was not going to cream like other recipes.


The dough got thick so when I added the nuts and chips I just used my hands to mix just till incorporated.

When i formed the balls I grabbed a chunk and placed it on the sheet. No rolling in a ball or smushing.


I then put these in the fridge and preheated my oven. In my research I found that putting them in the fridge makes them gooey in the middle so they were in there about 15 mins. 


YUM

OH MY


MINE


Levain Chocolate Chip Cookie Clone

2 sticks unsalted butter, cold

3/4 cup granulated sugar

3/4 cup packed brown sugar(i used dark brown)

2 large eggs

1 teaspoon vanilla

3 cups all purpose flour

3/4 teaspoon salt
1 teaspoon baking powder

1/2 teaspoon baking soda

12 ounces (2 cups) good quality semisweet chocolate chips
1 cup nuts (pecans or walnuts) (I used walnuts)


If using dough right away, preheat oven to 375 degrees F.
In a mixing bowl, using an electric mixer, beat butter and both sugars just until creamy. Don’t overbeat. Add the egg and vanilla and beat just until incorporated.
Stir together flour, baking soda, baking powder and salt. When thoroughly mixed, add to batter and stir just until blended. Stir in chocolate chips.
Divide dough into 12 big 4 oz lumps. Bake on ungreased cookies sheets (one sheet at a time).
Bake times:
Put the cookies in a 375 degree oven and set timer for 8 minutes. When timer rings, without opening oven or removing cookies, reduce heat to 325 degrees and bake for another 8-10 minutes or until cookies appear set.


VERDICT...

Delish :) My only complaint is that it has a little to much of a buttery taste that reminded me of those danish butter cookies in the blue tin you get for christmas. And I should have toasted the nuts before hand but thats my fault. But it was big, gooey, crispy, golden goodness. I would totally make this again. I give it 4 out of 5 stars. Give it a try, until next time guys stay sweet.


Strength is the capacity to break a chocolate bar into four pieces with your bare hands - and then eat just one of the pieces. ~Judith Viorst

Saturday, January 12, 2013

Pancake Puppies

By: Kimberly 

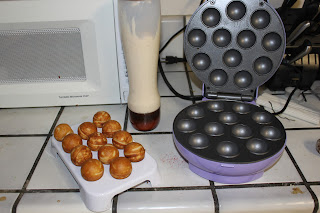
 I love breakfast.  I could honestly eat it for all three meals.  So a lot of the time I’m in the kitchen making breakfast.  But since the purchase of my new kitchen gadget (The BABYCAKES cake pop maker), I thought I’d use it for making breakfast.  Before purchasing the cake pop maker, I read a few (more like a 100) reviews about how others used their machine (which is one of the main reasons I purchased it). One reviewer wrote about how they used it to make appetizers, a ‘spicy cornbread with chilies and sausage in them served with a cheese sauce.’  How yummy.  If this little machine can be used for appetizers it should definitely be able to accommodate my breakfast needs.  So I made pancakes this morning with them.  I didn’t have a specific recipe to use (one that would help the pancakes rise or one specifically for the cake pop maker), so this was a first attempt recipe.  I started with the following ingredients:
 

2 cups of Bisquick mix

1 cup of buttermilk

2 eggs

3 tablespoons of sugar

2 teaspoons of baking powder

½ teaspoon of vanilla

1 teaspoon of cinnamon


  I mixed the ingredients until the batter was lumpy.  I thought that a measuring cup would be sufficient for pouring, but the batter is just a little too thick with the buttermilk, so I used my CUPCAKE PEN to fill the reservoirs.  I had my BABYCAKES machine pre-heated.  I wiped the reservoirs down with a little cooking spray, and then added the batter. 


As recommended by online reviews, I closed the lid and held it there for about 30 seconds to prevent the Saturn rings.  The pancake balls were ready in about a minute and they were perfectly browned. J


I let them cool on the provided cooling rack and added some more to the cake pop maker. (This time without spraying it.  I was lazy, but I wanted to see if they would stick.  They didn’t!)  The second batch was lighter on the top than the bottom, but I just flipped them over and cooked them an extra 20-30 seconds.


The family consensus:  Delish!!!  My son loved them.  He loves pancakes, and he loves dipping them in ketchup (I know, it’s gross, but he’s just as picky as I am, so whatever gets him to eat them will make me happy).  Making them in ball form makes them fun for dipping.  They had a really nice texture to them. 


Will I make them this way all the time?

No.  But for a fun way to mix it up at breakfast, I will do it again.  Maybe next time I’ll add sausage in the middle or fruits.  But it’s nice to know that I’m not limited to just cake pops.  


Friday, January 11, 2013

Partner in Cinn

By: Juanita

Hello, my name is Juanita and I will make this short and sweet :) I am a simple girl with a big sweet tooth. I would eat sugar all day if I knew it wouldn't go to my thighs. I want to challenge myself  in the kitchen and have some fun too. Other than being with my guy, I am happiest in the kitchen. Flour on my shirt, hair in a messy bun, and the smell of sugar and butter in the air. Yup, thats me.

Thursday, January 10, 2013

Cake Pops!!! (…and more)


Ways to Save... below.
By: Kimberly

I’m not going to deny that I didn’t have a lot of knowledge about cake pops.  I had enjoyed the tiny dessert a handful of times since they’ve become popular.  I’ve had the “original” cake pops with the frosting mixed in to crumbled cake and a candy-melts coating.  I am a bit of a sweet tooth (to say the least.  I add sugar to my hot chocolate.  I know, I know.).  But I have found in my experience with the “original” cake pops, that they are a tad too sweet for me.  I like to do a lot of research, and I’ve come across die-hard cake pop fans that will not have them any other way.  I commend those dedicated individuals.  But I’ve kind of stayed away from cake pops because they are such a rich and dense treat. 


 But then my husband bought me a cake pop pan (Bake Pops by TELEBrands) for Christmas, and he has since unleashed a monster.  I love that you don’t have to go through the million steps it takes to make the cake pops with frosting, and they bake pretty quickly.  I’ve made at least 100 cake pops since I got the pan (which nicely makes 18 pops at a time).  I’m a researcher though, and so I went online to make sure that what my husband got was a good product.  So I came across this YouTube video showcasing how the pan worked out.


And to me, the pros outweighed the cons.  I took the pan out of the box, and gave it a try.  I made sure not to overfill the reservoir (as people who did, ended up with not so pretty pops), keeping it just below the rim, and sprayed my pan with a flour-based cooking spray.  The first batch was ok.  I didn’t cook it for the time it said in the instruction book, but instead for about 15 minutes, and the result was pretty nice.  I did get the little rings of Saturn on a few of my pos, but those are easily removable.  Of the 18 pops I made on the first batch, one burned slightly on the bottom and one got stuck in the pan (two causalities in my first attempt is not bad at all.). They came out pretty round as well.  Some people have mentioned that their cake pops were more egg-shaped than round (or just plain flat on the top), but mine were fine.  I think it is important to follow the recipe that comes with the pan.  


The Recipe:

Follow the recipe on the box of cake but modify as follows

For any box of cake, add an extra egg
replace the water with milk (and reduce the amount by half)
add one packet of instant pudding best matching the flavor of the cake.  

The end result is nice.  The cakes are fluffy and they rise quite nicely.  I froze the cooled pops for about 10 minutes and then applied my melted chocolate to the sticks to prime them, and then inserted them into the cake pops, and froze them again for a few minutes to let the chocolate set.  After that, it was dipping, decorating, and consuming, and I have to say, that I like this version better. 
 

Some tips for filling the reservoir:


I came across another video of a lady making cake pops.  She used what is known as the CUPCAKE PEN (a.k.a. the pancake pen) to fill the reservoir (You can see the bottle at the 5:23 mark). 


It looked so clean and simple that I went out and bought one myself (You can find them at Cost Plus World Market for about $10).  But if you’re trying to save a dollar, I would recommend investing in a regular squeeze bottle.  You will need a funnel to fill them, but I’ve read they do the job just as well.  I like the cupcake pen for the fact that it has a large opening on the bottom of the bottle, which makes it easier to fill (if you’re any good, without a funnel). It has a large silicone tip, that makes dispensing easy. The recipes for the bake pops pan requires a thicker batter, which may clog a regular squeeze bottle. 
The downside: the bottle will get air in it, making it hard to squeeze the batter out at times.  With thick batter, as I used, it often gets stuck along the sides.  You can get your batter down the bottle with a small spatula so you’re not wasting batter.  If you can look past these things, the cupcake pen is helpful, plus you can use it for its other use, filling cupcake liners or muffin pans. 

  I also found that the WILTON DESSERT DECORATOR PLUS was helpful in filling the reservoir cleanly and smoothly, and I liked that I didn’t waste as much batter as I did with the cupcake pen.  This works for the thick batters (like brownie or Bake Pop recipe batter). 

 The downside: the fact that the barrel on the decorator is small, so you have to fill it a few times and of course I can’t imagine using a runny batter in the decorator.  

But if you don’t want to spend any money, find a Ziploc bag.  This will help in filling the reservoir and give you the control to fill it with the necessary amount. 

The downside: this definitely doesn't work for runny batters.


Cake pops using my Bake Pops Pan. 

Now I like my Bake Pops pan, and I really have to thank my husband for finding something (on his own) I can do quickly and have fun doing (he hasn’t always been great at gift giving without a little help).  But researcher me came across a machine that blows my cake pop pan out of the oven.  In the YouTube video mentioned above, Anh had a BABYCKAES cake pop machine (actually she had two).  And I was amazed at how quickly she got her cake pops done.  As soon as she put them in, they were practically ready to come out.  So I thought to myself, imagine the possibilities.  I did a little research, and came across the blog/website  Love From The Oven (I love this blog by the way.  It’s cute, inviting and fun.), that did a review of the machine, and she sold me on it. I now own the BABYCAKES cake pop maker, and I like it because I’ve cut my time by more than half the time it takes for the pan in the oven.  The BABYCKAES machine is versatile.  You don’t have to make just desserts in them.  I’ve come across a few reviews of people who have made corn muffins, meatballs and pancakes.  So if you’re serious about changing the way you make cake pops, or maybe you just want to spend less time doing them, I think you should give this little machine a try.  And if you're still committed to the "original" way, you can always inject the little suckers with frosting (I did it for the cake pops above).


As my new favorite toy, I’ll be experimenting in the kitchen with it, and I’ll share what happens in future blogs.
  

As promised, in part, this blog will provide you with great ways to save.


I rarely pay full price for anything, and so I found my BABYCAKES maker at Bed Bath and Beyond for only $11.99!!!! This little amazing machine is already on sale at Bed Bath and Beyond for $14.99 (which is a pretty gosh darn good deal anyway, as these machines retail for $29.99).  But if you have one of those wonderful coupons, you can take an additional 20% off the sale price.  You save $18.  I’m not sure how long this offer goes for, so you should check your local Bed Bath and Beyond now.

The Wilton Dessert Decorator is another tool any at-home baker should have.  I purchased mine at Joann’s Fabric’s with a 50% off coupon that you can currently get through their app (on iTunes.  I’m not sure if its in the android market or not).  That made my decorator only $7.99.  And it’s a versatile tool, so you’ll definitely use it.  Don’t fret if you don’t have a Joann’s.  Michael’s honors competitors’ coupons and vice versa (a little tip few people know.  Just have a paper coupon handy.).


Questions?  Comments? Please feel free to leave them below.  J

Wednesday, January 9, 2013

Meet Me (Kimberly)


I love San Francisco and baking this much!!!

My name is Kimberly, and I’m a California girl (born and raised).  I currently reside in Sacramento, CA, where I live with my husband and my wonderful son.  I’m a student (at the University of California, Davis), on the road to graduation (I have less than 2 months left).  I’m majoring in mathematics, with a minor in education.  The road has been a long one to say the least.  I graduated high school more than 10 years ago, and after some back and forth with what to major in, and then getting pregnant and married, school took a seat on the back burner.  I went back after a couple years (and being laid-off from my job), and decided to pursue a degree in education, because I’m very passionate about teaching.  When I’m not in school, I’m exploring the city (of San Francisco), going on random drives to nowhere (or the beach.  I love the beach), doing outdoor photography (with my Canon DSLR), or baking.  I love to bake.  I’ve been baking for as long as I can remember.  I use to spend a lot of time with my grandmother (before she passed away), and she taught be a lot about cooking.  I’m still amazed at the fact that she could put a whole meal together for 10 people in a day without burning anything (a feat I have yet to accomplish).  Her cooking was southern cooking, rich in butter and fat.  And even now that I have replicated some of her dishes, nothing compares to what she made.
 Despite my love for cooking, I’m probably the world’s pickiest eater.  I stick to baking because I find that I like a better variety of foods in the baking category.  That doesn’t mean I won’t cook it.  I love cooking for others, and so I will often make things even though I won’t necessarily eat it myself.  I want to work on expanding my horizons, but there are so many rules I make for eating, it’s ridiculous.  It’s a new year though, so we’ll see.


So a little background on this blog… 


Lets start with the title.  Why cinn (and not cinnamon)?  Well, I like the abbreviation and I hope that one day it will catch on.  But I also like the spice.  Breakfast is my favorite meal of the day, and I often find that I put cinnamon in a lot of the things I make (my pancakes, waffles, french toast, cinnamon toast….) and it is by far my favorite smelling spice.  The aroma reminds me of Christmas pinecones, and who doesn’t enjoy holiday reminders?  So Cinn and Spice it is.


Where did the idea of blogging come from?


Well, the original motivation is my own, but I hardly ever do anything by myself.  My friend Juanita and I always talk “baking” together.  Whenever we get together we bake, and we’ve been discussing for a few years on what we would do if we opened our own bakery.  It all started as a dream, but the more you talk about dreams, the more you want them to come true, and so I hope to achieve opening a bakery some day with Juanita.  We’re starting off with this blog.  And we’ll see where it takes us.  You’ll get to learn more about Juanita in her post.


Why a baking blog?


Well, there are a million baking blogs out there.  I’m almost certain mine won’t differentiate too much from the rest, but I like to talk, and I like to bake, and so its not about getting as many followers as possible, but just getting my ideas, and thoughts and feelings about the kitchen out into the world (wide web) and maybe teaching a few people in the process.
 This blog will in a way hold me accountable for trying to get into the kitchen more, and motivate me to see my goals become a reality.  I can seek help from those who read my blog, and in return offer advice to those who also may want to open a bakery as well.  I also love to teach.  I feel like it’s a calling.  And I think I’ve finally got it right.  Baking and teaching: all meshed into one.  I’ve always been a kind of science nerd, so experimenting in the kitchen is fun for me.  My successes and failures will be a learning tool for everyone.


But you’re a novice, so why the big ambitions?


Well, I am a novice, but I have enjoyed baking since I was 3 years old.  I have lots of memories in the kitchen with my grandmother (who I adored and loved with all my heart).  This dream is in part paying homage to her memory and also working on a few goals myself.  I struggle with finding what makes me happy.  I’m heading into my 30’s and I feel like I’m in high school with no idea what I want to be “when I grow up.”  I originally wanted to teach with my degree, and will likely do so, but I find that the stipulations of teaching will bog me down in the classroom.  And as a California resident, the school system is pretty bad off anyway.  Before teaching I was going into veterinary medicine, but I realized how much I hated biology.  And then there was the stint with biotechnology (but that didn’t last that long).  My point is, I’ve been all over the place for as long as I can remember, but one thing that I’ve always enjoyed, was cooking.  I love experimenting in the kitchen.  I loved waking up early with my grandmother on thanksgiving or Christmas day, and making the ham, and the dressing and the sweet potato pie.  And after some sole searching, I realized that I needed to work on things that make me happy.  School does not make me happy (I’m earning a math degree.  Enough said).  Working big-box retail does not make me happy (I can’t fake smile it anymore.  People are just mean).  Being a homebody does not make me happy, unless I’m in the kitchen.  So last year I thought to myself, why not work more on baking?  Don’t just talk about it, actually do it.  Juanita and I go back and forth on baking ideas, and opening a dream bakery.  So I started with a couple of cakes.  I first made a cake for a friend’s birthday, experimenting with fondant (It was a lot of work, and very time consuming, but I had fun in the process). It looked amateur at best, but my friend enjoyed it, and the compliments I received helped a lot. 


(a popcorn bag cake, for my friend who loves movies.  The cake was a tiramisu-flavored cake with mascarpone frosting.)

I moved on to make another friends (yes, my 25 year old friend) birthday cake.  This time I experimented with cake carving (and no fondant.  Did I mention that fondant is really hard to work with?).  It was a simple cake (that I actually had to make twice because the first time I messed up (badly) on the piping), but once again, I enjoyed seeing my ideas become a reality.

(A Pokémon cake, not from scratch.  This is just a box cake with box frosting.  But I did do the coloring of the frosting).


(Toy elements added for appeal)

My third attempt was a cake for a friend made on a bet.  It was my friend’s graduation and birthday party.  I wanted to make her a special cake.  Our other friend wanted to make her cake pops that she thought would be better than my cake.  And so it was on!  I spent more than 16 hours making boxed cakes (a total of 18 I think went into the process), buttercream frosting from scratch, fondant rolling, dirty icing, and stencil and piping work (with the help of a dear friend.  That cake would not have been finished without her).  Unfortunately it was the hottest day of the year (in the California valley), and my buttercream didn’t hold.  My cake melted and cracked before it got to the party.  On the upside (for at least me), the friend I was competing against had all of her cake pops melt and fall apart too.  They were a sidewalk decoration.  We called it a draw because she spent just as much time and hers were just as much a disaster as mine (although I do have to confess, they were decorated quite nice).


(This was a three-tiered disaster.  The first layer was a devils food cake with fresh strawberries and chocolate drizzle in the center.   The second layer was a French vanilla cake with a buttercream frosting middle.  And the last layer was a chocolate cake with I a chocolate buttercream frosting.  The cake as you can see looks like a pillow, but that’s because it started to cave in from the buttercream not holding up.  Also the stencil work on the damask print was a booboo on my part.)

My last attempt at amateur cake work came when I offered to make my sister-in-laws cake for her baby shower.  I had the idea of what I wanted to do in my head, but unfortunately it didn’t quite make it in my cake work.  The icing I made melted (It gets pretty hot here in Sacramento) and so when I went to decorate what was supposed to be Simba (with textured fur), turned out to look more like a gremlin.


(Meet Gremlin…I mean Simba.  I was so proud of my Rice Krispy molding skills, but frosting the little monster turned out to be failure.  The royal icing I used lost its hold before it set.)


(What arrived at the party.  Once again, it was hot that day, although not as hot as my last cake fiasco, and so it started to sink a little.)

The fondant work turned out nice (thanks to my husband for rolling it out), but the sugar cookie animals not so much.  I think it was at that point that I decided that I should stick to cupcakes (something I enjoy making, and find pretty easy to do).  I may one day explore cake work again, but for the time being I’ll stick to basic sweets.  


What can I look forward to with your blog?


Well, you can look forward to getting to know me.  And that’s pretty cool I’d say.  But more importantly you can get to learn while my friend Juanita and I learn.  We will be doing a lot of experimenting in the kitchen.  We will find what works and doesn’t work, and hopefully enlighten and inspire you to experiment as well.  We want to provide you with some recipes, and ideas that will get you in the kitchen.  We want to introduce you to products we use, and tutorials on how we use them. And maybe give a few things away as well.  We want to have open discussions where you can ask questions, post ideas, and share your thoughts as well.  So come and be a part of the Cinn & Spice family.